

How to change an IP Address in less than 1 minute?
As we all know IP which is the Internet Protocol Address is a unique number given to a computer when it is connected to the internet. On the other hand, IP Address identifies a resource on a network and allows nodes to connect and communicate over a network. So kindly follow the steps chronologically to change your IP Address in less than 1 minute.
1. Click on “Start” in the bottom left hand corner of the screen
2. Click on the “Search” bottom
3. Type in “command” and hit OK
You should now be at the command prompt screen.
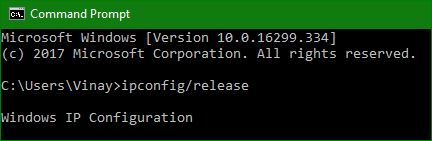
4. Type “ipconfig /release” just like that, and hit “enter”
5. Type “exit” and leave the prompt
6. Right-click on “Open Network and Sharing Center/Control” on your bottom right hand corner of your desktop screen.
![]()
7. Select and click on “Change adapter settings” from the control panel home.
You should now be on a screen with something titled “Network Connections”, or something close to that, and, if you have a network hooked up, all of your other networks.
8. Double click on any of the icons with an Ethernet icon.
9. Select the “Internet Protocol Version 4 (TCP/IPv4)” from the list under the “Networking” tab of the Ethernet Properties. Then click on properties just beneath the options provided.
10. Click on “Use the following IP address” under the “General” tab to visualized the options.
11. After, type in the respective IP address. (E.g. 192.168.0.1)
12. Press “Tab” and it should automatically fill in the “Subnet Mask” section with default numbers like 255.255.255.0 as correspond to the given IP Address.
13. Hit the “OK” button and close the rest of the tabs.
With a little practice, you can easily get this process down to 15 seconds.
![]()
Leave a Reply