

In this lesson, we shall be covering Forms in HTML.
Forms help us to get data from users either to sign up for a page or to comment on a page.
Objectives
- We’ll use the <form></form> tag to create the form
- We’ll use the <Input> tag to specify the type of data we want to accept
- We’ll use the <label></label> tag to display a description to the user
- Write simple form validations for our forms, so that someone cannot leave a password or email blank
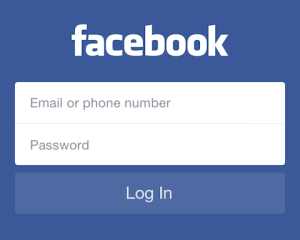
Examples of forms we use day to day are the Facebook login or register form, google search form, Instagram search form. On this site, I have a form on my Contact page. You can check it out.
The <form> tag
[html]</pre>
<form action=”/the-page-to-submit-data-collected” method=”post”>
<!– All our inputs will go here –>
</form>
<pre>[/html]
In the code snippet above, you will realize where have the action and method attributes;
- The Action attribute: is the URL to send the form data to
- The Method attribute: is the type of HTTP request we want
Note: Until we get to the Back-end JS lessons, our forms won’t actually do anything. Our form is only going to be the frond-end, the user interface for interaction.
The Form tag is just like a shell or a container for all different types of input. Examples of inputs are check boxes, drop-down menus, text input field and more. We’ll learn more as we go further.
So basically, a form sends data to a server somewhere using the “action” attribute. On the other hand, the attribute “method” helps us to specify whether we want to post data to a database server or get data from the database server.
For example, when you use google to search, the form makes a get request, it will purely get data back to you the user from the database server.
On the other hand the Facebook or Instagram sign up form will make a post request, sending your data to the database server.
We’ll work with this later in the course.
The <Input> tag
The input tag creates the interactive controls. It helps us specifies what is actually collected by our form. This is the tag going to create the different inputs that we want. see example below;
The “type” attribute determines the type of input.
Examples
[html]
<input type=”text”>
<input type=”color”>
<input type=”date”>
<input type=”file”>
<input type=”checkbox”>
[/html]
You’ll realize that they are all the same except for the type attribute.
Now to make a form.
[html]
<!DOCTYPE html>
<html>
<head>
<title>Form Demo </title>
</head>
<body>
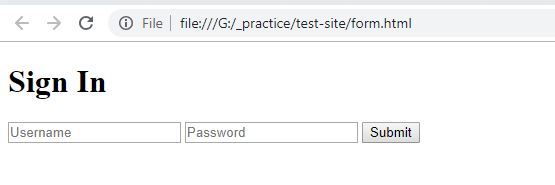
<h1> Sign In </h1>
<form action=”/sign-in-url” method=”post”>
<input type=”text” placeholder=”Username” name=”username”>
<input type=”password” placeholder=”Password” name=”password”>
<input type=”submit” value=”Login”>
</form>
</body>
</html>
[/html]
With the example above, we have an output below, you will realize that there are three attributes used in each input field
The Type: Specifies the type of data to be posted to the server, In our code snippet above, we have type as text for the username, type as password for the password value, and type as submit for the submit button.
The Placeholder attribute helps us to describe each input field to the user,
The Name attribute helps us to identify each field so that we can write a script to collect and process the data.
When the submit button is clicked, nothing happens, the page just refreshed. In future lessons, we shall be creating a back-end to handle the data.
Labels in Forms
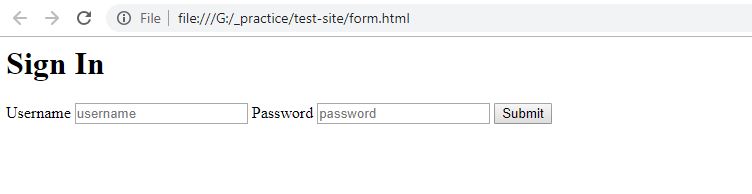
Label helps us add captions to individual elements in our form, labels are really important in making our forms accessible, especially for the visually impaired or blind. The screen reader software they use will look for label tags so that they can fill the form.
[html]
<!DOCTYPE html>
<html>
<head>
<title>Form Demo </title>
</head>
<body>
<h1> Sign In </h1>
<form action=”/sign-in-url” method=”post”>
<label for=”username”>Username</label>
<input type=”text” id=”username” placeholder=”username”>
<label for=”password”>Password</label>
<input type=”password” id=”password” placeholder=”password”>
<input type=”submit”>
</form>
</body>
</html>
[/html]
In the code snippet above, we have the label tag implemented, which has the “for” attribute that helps in specifying the input tag to which the label belongs, The Id attribute is used to identify the uniqueness of every input, therefore every input tag must have a unique ID, the name attribute can also be used, but two input tags can have the same name unlike the Id.
Output
Simple forms Validations
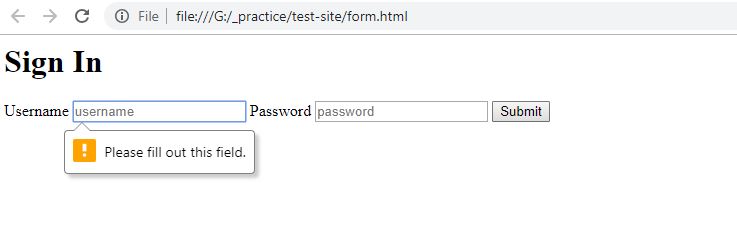
Validations refer to the ability to enforce rules and structure in different parts of a form when filling it. For example, User must not leave an input field blank or user must enter a valid email address.
We have three ways to implement validations
- Simple HTML validation
- JavaScript Validation
- Server-side (back-end validation)
For now, we’ll learn the simple html validations. We’ll check to make sure there are no empty values by adding a Boolean attribute called required (because you don’t have to specify any value, and boolean means either true or false). For both the username and the password
[html]
<html>
<head>
<title>Form Demo</title>
</head>
<body>
<h1> Sign In</h1>
<form action=”/sign-in-url” method=”post”>
<label for=”username”>Username</label>
<input type=”text” id=”username” placeholder=”username” required=””>
<label for=”password”>Password</label>
<input type=”password” id=”password” placeholder=”password” required=””>
<input type=”submit”>
</form>
</body>
</html>
[/html]
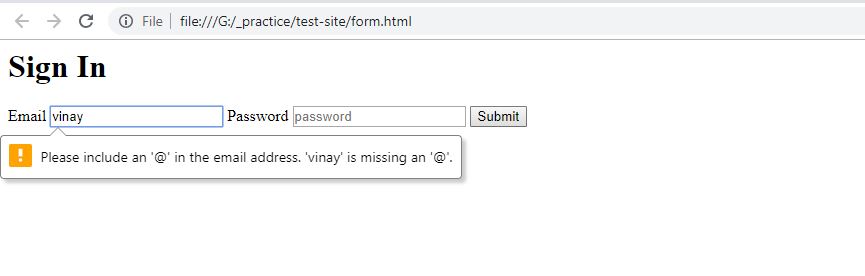
Furthermore, lets change the username to email and check for the email validations.
[html]
<html>
<head>
<title>Form Demo </title>
</head>
<body>
<h1> Sign In </h1>
<form action=”/sign-in-url” method=”post”>
<label for=”email”>Email</label>
<input type=”email” id=”email” placeholder=”email” required=””>
<label for=”password”>Password</label>
<input type=”password” id=”password” placeholder=”password” required=””>
<input type=”submit”>
</form>
</body>
</html>
[/html]
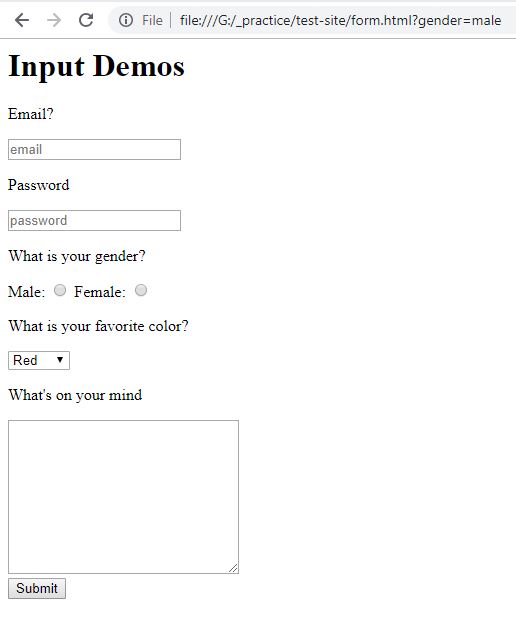
Radio, Checkbox, Select and Textarea Input fields in HTML forms
These are other important input types in HTML forms.
- Radio Input: Used to specify one choice during data input, mostly used for gender selection
- Checkbox input: Used to specify multiple selection, like hubbies during a form input
- Select Input: It is also used for making a selection off several options, can be used for gender selection or courses
- Textarea Input: Mostly used for lengthy text input, like description, curriculum vitae or message
[html]<html>
<head>
<title>Inputs Demo </title>
</head>
<body>
<h1> Input Demos </h1>
<form></pre>
<p>Email</p>
<label for=”email”></label>
<input type=”email” id=”email” placeholder=”email” required=””>
<p>Password</p>
<label for=”password”></label>
<input type=”password” id=”password” placeholder=”password” required=””>
<p>What is your gender?</p>
<label for=”male”>Male:</label>
<input type=”radio” id=”male” name=”gender” value=”male”> <!– Used when a user has one choise –>
<label for=”male”>Female:</label>
<input type=”radio” id=”female” name=”gender” value=”female”> <!– Used when a user has one choise –>
<p>What is your favorite color?</p>
<select name=”color”>
<option value=”red”>Red</option>
<option value=”green”>Green</option>
<option value=”blue”>Blue</option>
</select>
<p>What’s on your mind</p>
<textarea name=”message” cols=”30″ rows=”10″></textarea>
<input type=”submit”>
</form>
</body>
</html>
<pre>
[/html]
The Output
Congratulations! Now let’s get started with CSS in the next lesson
![]()
Leave a Reply