
Certificate Security as tardily become the major topic in today’s tech world. Indeed, compromising with it will be a huge risk to take as a system administrator.
As every computer found on the internet is off a particular computer network. I have decided to create this step by step tutorial which comes with a video as well to help reduce the risk of loosing data to intruders, hackers or attackers.
The tutorial is based on Windows Server 2016 operating system.
Prerequisite to this is;
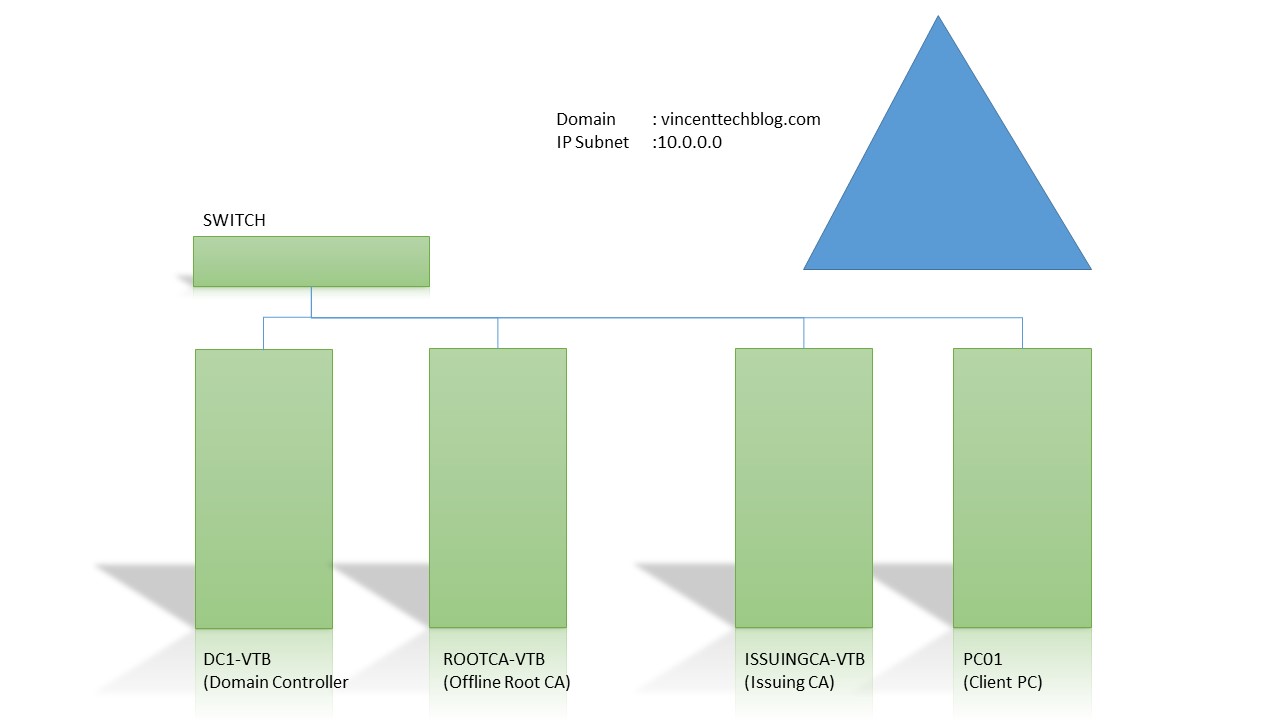
You must have a running domain, with necessary IP address and server role operation skill.
Content
- Installing ADCS on ROOTCA-VTB Server
- Configuring the ADCS on ROOTCA-VTB Server
- Configuring ISSUINGCA-VTB as a Web Server
- Putting the Certificates on a Central Storage for use
- Installing the CA and CA Web Enrollment on ISSUINGCA-VTB
- Configuring ISSUINGCA-VTB
or Watch Video
Configuring the Offline Root Certificate Authority
[ps2id id=’Installing-ADCS-on-ROOTCA-VTB-Server’ target=”/]
Installing ADCS on ROOTCA-VTB Server
Step 1 – Open Server Manager, from the ‘Manage’ dropdown menu on the top-left, select ‘Add roles and Features’ option
Step 2 – On the ‘Before you begin’ screen, select ‘Next’ and the ‘Installation type’ appears, select ‘Role-based or feature-based installation type’ and select ‘Next’
Step 3 – On the ‘Destination Server’ screen, select the server and click ‘Next’
Step 4 – On the ‘Select server roles’ screen, choose ‘Active Directory Certificate Services’ role, on the pop-up, select ‘Add Features’, and click ‘Next’.
Step 5 – On ‘Select features’ screen, do not select any feature, just click ‘Next’ and then, on the ‘Active Directory Certificate Services’, click ‘Next’
Step 6 – On ‘Select role services’ screen, select ‘Certificate Authority’, click ‘Next’ and then, Select Install.
Configuring the ADCS on ROOTCA-VTB Server
[ps2id id=’Configuring-the-ADCS-on-ROOTCA-VTB-Server’ target=”/](After installation is complete, continue…)
Step 1 – On the ‘Installation progress’ screen, click ‘Configure Active Directory Service on the destination server’
(The ADCS Configuration console pops up)
Step 2 – On the ‘Credentials’ screen, click ‘next’, then on the ‘Role Services’ screen, select ‘Certificate Authority’ and click ‘next’
Step 3 – On the ‘Setup type’ screen, select ‘Standalone CA’ and click ‘next’, then on the ‘CA Type’ screen, select ‘Root CA’ and click ‘next’
Step 4 – On the ‘Private key’ screen, select ‘Create and new private key’, then on the ‘Cryptography for CA’ screen, we’ll use default of 2048 key length, click ‘next’
Step 5 – On the ‘CA Name’ screen, give a realistic name to the CA. E.g. ROOT-CA-VTB, click ‘next’, then on the ‘Validity Period’ screen, specify the amount of years you prefer, I typed 10 years, click ‘next’
Step 6 – On the ‘CA Database’ screen, do not change the path, and click ‘next’, then on the ‘Confirmation’ screen, click ‘Configure’
Configuring ISSUINGCA-VTB as a Web Server as well
[ps2id id=’Configuring-ISSUINGCA-VTB-as-a-Web-Server’ target=”/]Switch to the ISSUINGCA-VTB Server (Log in as the Domain Administrator, my username is VincentTechBlog\Administrator, then your password.
Step 1 – Open Server Manager, from the ‘Manage’ drop-down menu on the top-right, select ‘Add roles and Features’ option
Step 2 – On the ‘Before you begin’ screen, select ‘Next’ and the ‘Installation type’ appears, select ‘Role-based or feature-based installation type’ and select ‘Next’.
Step 3 – On the ‘Select server roles’ screen, choose ‘Web Server (IIS)’ role, on the pop-up, select ‘Add Features’, and click ‘Next’.
Step 4 – On ‘Select features’ screen, do not select any feature, just click ‘Next’ and then, on the ‘Web Server (IIS)’, click ‘Next, on the ‘Confirm Installation Selection’, Click ‘Install’
Now we will create a folder call ‘CertData’ in the web root location. (C:\inetpub\wwwroot\CertData) to store
Switch back to the ROOTCA-VTB to continue Configuration
Step 1 – On the Server Manager, click ‘Tools’ on the dropdown options, select ‘Certificate Authority’.
Step 2 – On the Certificate Authority console, right-click on the ROOTCA-VTB-CA and select ‘Properties’,
Step 3 – Select the ‘Extensions’ Tab, in the Select extension drop down, select ‘CRL Distribution Point (CDP)’, and click Add
NOTE: Ensure ‘Publish CRLs to this location’ and ‘Publish Delta CRLs to this location’ are both checked
Step 4 – On the Add location pop-up console, add the location and click Ok
Mine is ‘http://issuingca-vtb.vincenttechblog.com/CertData/<CaName><CRLNameSuffix><DeltaCRLAllowed>.crl
Step 5 – Back to the Extensions list, you will realize that your new location is now part of the list and it’s selected.
NOTE: Ensure ‘Include in CRLs Clients use this to find Delta locations’ and ‘Include in the CDP extension of issued certificates’ are both checked
Step 6 – Now on the ‘Select extension drop down’, select ‘Authority Information Access (AIA)’ and click Add
Step 7 – On the Add location pop-up console, add the location and click Ok
Mine is ‘http://issuingca-vtb.vincenttechblog.com/CertData/<ServerDNSName>_<CaName><CertificateName>.crt
Step 8 – Back to the Extensions list, you will realize that your new location is now part of the list and it’s selected.
NOTE: Ensure ‘Include in the AIA extension of issued certificates’ is checked
Step 9 – Click Apply, the AD services will be restarted automatically
Now publishing the CRLs
Step 10 – Right-Click on the ‘Revoked Certificates’ and select ‘All Tasks’ and further select ‘Publish.
Step 11 – On the Publish CRL console, at the Type of CRL to publish section, ensure the New CRL radio button is selected and click Ok
Now our CRL Distribution Points Certificates are published locally. We need to copy them to the Issuing CA
Step 12 – Go to C:\Windows\System32\CertSrv\CertEnroll, you will find our CRL Distribution Point and AIA Certificates
Note: we need to add the CA certificate there as well
Step 13 – Switch Certificate Authority Console, right-click on the ROOTCA-VTB-CA, select properties, click view Certificate, on the pop up, switch to the details tab, Click copy to file
Step 14 – On the Certificate Export Wizard, Click Next, under Export File Format, select ‘DER encoded binary X.509 (.CER)’ and click ‘Next’
Step 15 – On the File to Export screen, click ‘Browse’, and specify the CertEnroll location C:\Windows\System32\CertSrv\CertEnroll and save the certificate there. I called mine, rootca_Certificate, then click next and Finish
Now we have three certificates in the CertEnroll folder
Putting the Certificates on a Central Storage for use
[ps2id id=’Putting-the-Certificates-on-a-Central-Storage-for-use’ target=”/]Step 1 – Create a folder on the C:\ of the ISSUINGCA-VTB called Certs, and right-click the Certs, click Properties, then click the Security tab, then click Share, on the File Sharing screen, click the drop-down and select Find People, type Authenticate User, and click Check Names, Set the Permission Level for the Authenticated user to Read/Write, then click Share and Done.
Now that your drive is shared
Switch back to the ROOTCA-VTB
Step 1 – Open C:\Windows\System32\CertSrv\CertEnroll folder and copy all three certificates to the share location \\Issuingca-vtb\Certs
Step 2 – Goto DC1-VTB, on the Server Manager, from the Tools drop-down menu, seleft Group Policy Management
Step 3 – Expand Forest node, to Domains, and vincenttechblog.com/, right-click on Default Domain Policy, select Edit
Step 4 – On the Group Policy Management Editor, Expand Computer Configuration, then Policies, then Windows Settings, then Security Settings, then Public Key Policies, then right-click Trusted Root Certification Authorities, and select import
Step 5 – On the Certificated Import Wizard, click Next, and browse for the CA Certificate, type in the address bar, \\issuingca-vtb\certs, select the ‘rootca_Certificate’ and click open, then click Next, and then click next again, and click finish. You import should be successful.
Step 6 – Goto Command Prompt, type ‘gpupdate /force’
Installing the CA and CA Web Enrollment on ISSUINGCA-VTB
[ps2id id=’Installing-the-CA-and-CA-Web-Enrollment-on-ISSUINGCA-VTB’ target=”/]Step 7 – Goto the ISSUINGCA-VTB, switch to the Server Manager, from the Manage drop-down select Add Roles and Features, from the pop-up Wizard, click Next, Select Role-Based or feature-based Installation, and click Next, select your destination server and click Next,
Step 8 – Choose the ‘Active Directory Certificate Services’ role, and click next, then select Add Features from the Feature pop-up screen and click Next
Step 9 – On the Select Features screen, click Next, on the Active Directory Certificate Services screen, click Next, on the Select role services, Select Certificate Authority and Certificate Authority Web Enrollment, on the ‘Add Roles and Features Wizard’ pop-up screen, click ‘Add Features’ and click ‘Next’, on the Confirm installation selections, click ‘Install’
Configuring ISSUINGCA-VTB
[ps2id id=’Configuring-ISSUINGCA-VTB’ target=”/]Step 10 – On the Installation progress screen (After installation succeeded) click Configure Active Directory Certificate Services on the Destination Server.
Step 11 – On the Credentials screen (Ensure you are logged in with the Domain admin – VINCENTTECHBLOG\Administrator) and click Next
Step 12 – On the Role Services screen, select Certificate Authority and Certificate Authority Web Enrollment, click Next, on the Setup Type, Choose Enterprise CA and clicks Next, on the CA Type screen, choose Subordinate CA, and click Next
Step 13 – on the Private Key screen, choose Create a new private key and click Next, on the Cryptography for CA screen, leave default values and click Next, on the CA Name screen, enter a friendly common name (mine is ISSUING-VTB-CA) and click Next
Step 14 – On the Certificate Request screen, choose Save a certificate request to file on the target machine. (my location is C:\) on the ISSUINGCA-VTB Server, on the CA Database screen, leave Certificate database location to default and click Next
Step 15 – On the Confirmation screen, click Configure
Step 16 – When configured, go to C:\ drive and find the Request file. Copy the file to the ROOTCA-VTB.
Step 17 – On the ROOTCA-VTB, open the Certificate Authority Console, right-click on the ROOTCA-VTB-CA node, and select All Tasks – Submit new request, on the Open Request File pop-up, select the Request file you copied.
Step 18 – Switch to the Pending Requests node, the new request will be pending, right-click on the pending file, select All Tasks and click Issue
Step 19 – Switch to the Issued Certificates, you will find the Subordinate CA certificate. Open the certificate, switch to the Details tab, click the Copy to File button.
Step 20 – On the Certificate Export Wizard, click Next, on the Export File format screen, choose Cryptographic Message Syntax Standard – PKCS #7 Certificates (.P7B) and select, Include all certificates in the certification path if possible. And click Next
Step 21 – Click browse, specify a name for it (Mine is IssuingCACertificate) and save it in the C:\Windows\System32\CertSrv\CertEnroll folder on the ROOTCA-VTB server, and click Next and Finish.
Step 22 – Copy the IssuingCACertificate.p7b Certificate and paste in the \\Issuingca-vtb\C$\Certs folder. The folder ‘Certs’ is located in the C:\ drive of the Issuing CA
Now goto the ISSUSING CA to give apply the new Certificate
Step 23 – Goto the C:\Certs, copy the CRL and CRT files and paste them in the C:\inetpub\wwwroot\CertData folder
Step 24 – Open the Certificate Authority Console, right-click on the ISSUINGCA-VTB-CA node and select All Tasks and choose Install CA Certificate, find the certificate in the C:\Certs folder and click open
Step 25 – Right-Click ISSUINGCA-VTB-CA, select All Tasks and choose Start Service.
Now to see your certificate
Run dialog box, type certmgr.msc and open the Intermediate Certification Authorities node, and select Certificates, you will find the certificate issued to the ISSUINGCA-VTB-CA
[ps2id id=’video’ target=”/]
Watch Video
Continue to part 2…
![]()
Leave a Reply