
In this post we’ll be working with Flutter, a fast-rising Developer tool built by Google to develop an Android App, the same code will also work in Apple’s iOS devices.
Flutter is a Widget based style of building mobile and web applications Interfaces.
What is Flutter?
Flutter is Google’s mobile UI framework for crafting high-quality native interfaces on iOS and Android in record time. It is used to develop applications for Android and iOS, as well as being the primary method of creating applications for Google Fuchsia. Using a single codebase, you can develop mobile apps for both Android and iOS at the same time without putting extra effort. Flutter works with existing code, and is used by developers and organizations around the world, and is free and open source.
Installing Flutter
Kindly ensure to setup Flutter on your system first before continuing with this tutorial. If you are using Linux Distros, you can see Setup Tutorial here, if Mac OXS or Windows See Setup here
If you are using Linux or Windows after you complete the setup, you must have installed;
- Java SDK
- Android Studio
- Flutter
- Dart
- Flutter plugin for Android Studio
- Android AVD Emulator
If you are using MAC OSX for iOS after you complete the setup, you must have installed;
- Java SDK
- Xcode
- Flutter
- Dart
- Flutter plugin for Xcode
- iOS simulator
After setup is complete, checkout your flutter version below;
$ flutter --version
Below is my output, showing my flutter version
Flutter 1.17.3 • channel stable • https://github.com/flutter/flutter.git
Framework • revision b041144f83 (12 days ago) • 2020-06-04 09:26:11 -0700
Engine • revision ee76268252
Tools • Dart 2.8.4
Creating the App
Open the termial or command prompt and type
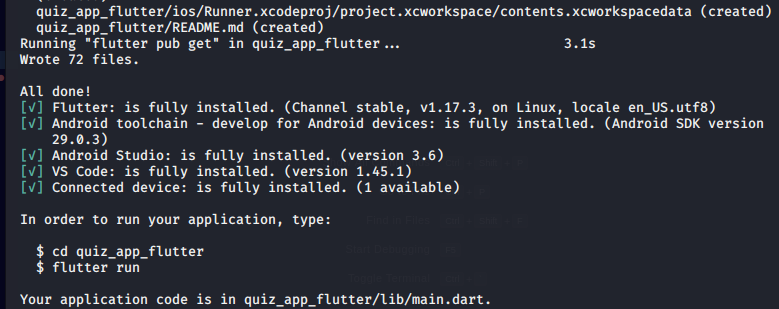
$ flutter create quiz_app_flutter
You should get a similar output just like me below which shows All done!
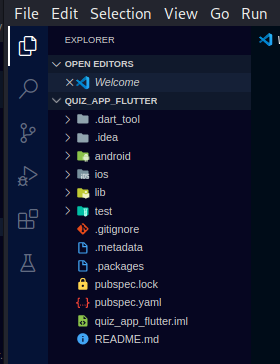
Now, let us go into the directory and open our app in VSCode preferably or Android Studio depends on your choice.
$ cd quiz_app_flutter
$ code .
The code above opens our app with the VSCode application. After VSCode opens up with our project, the folder structure should look similar to mine as shown below;
Now let us go to the ‘lib’ folder and create a new file called ‘questions.dart’ where all our questions will be stored, copy and paste the code below;
//this will create a Questions class specifying that all questions
//should entail a questionText and a questionAnswer

class Question {
  String questionText;
  bool questionAnswer;

  Question({String qtn, bool ans}) {
    questionText = qtn;
    questionAnswer = ans;
  }
}
Now, still inside the ‘lib’ folder, create another file called ‘quiz.dart’ where all our questions will be stored
// this will import the questions class we created above
import 'questions.dart';
// This class setup private properties and methods for our questions
class Quiz {
// this private variable helps us to keep track of the current question Number.
//Note: it is private because of the leading underscore which was added
int _questionNumber = 0;
// this List variable will store our questions
//and answers as specified in the questions class
List _questionList = [
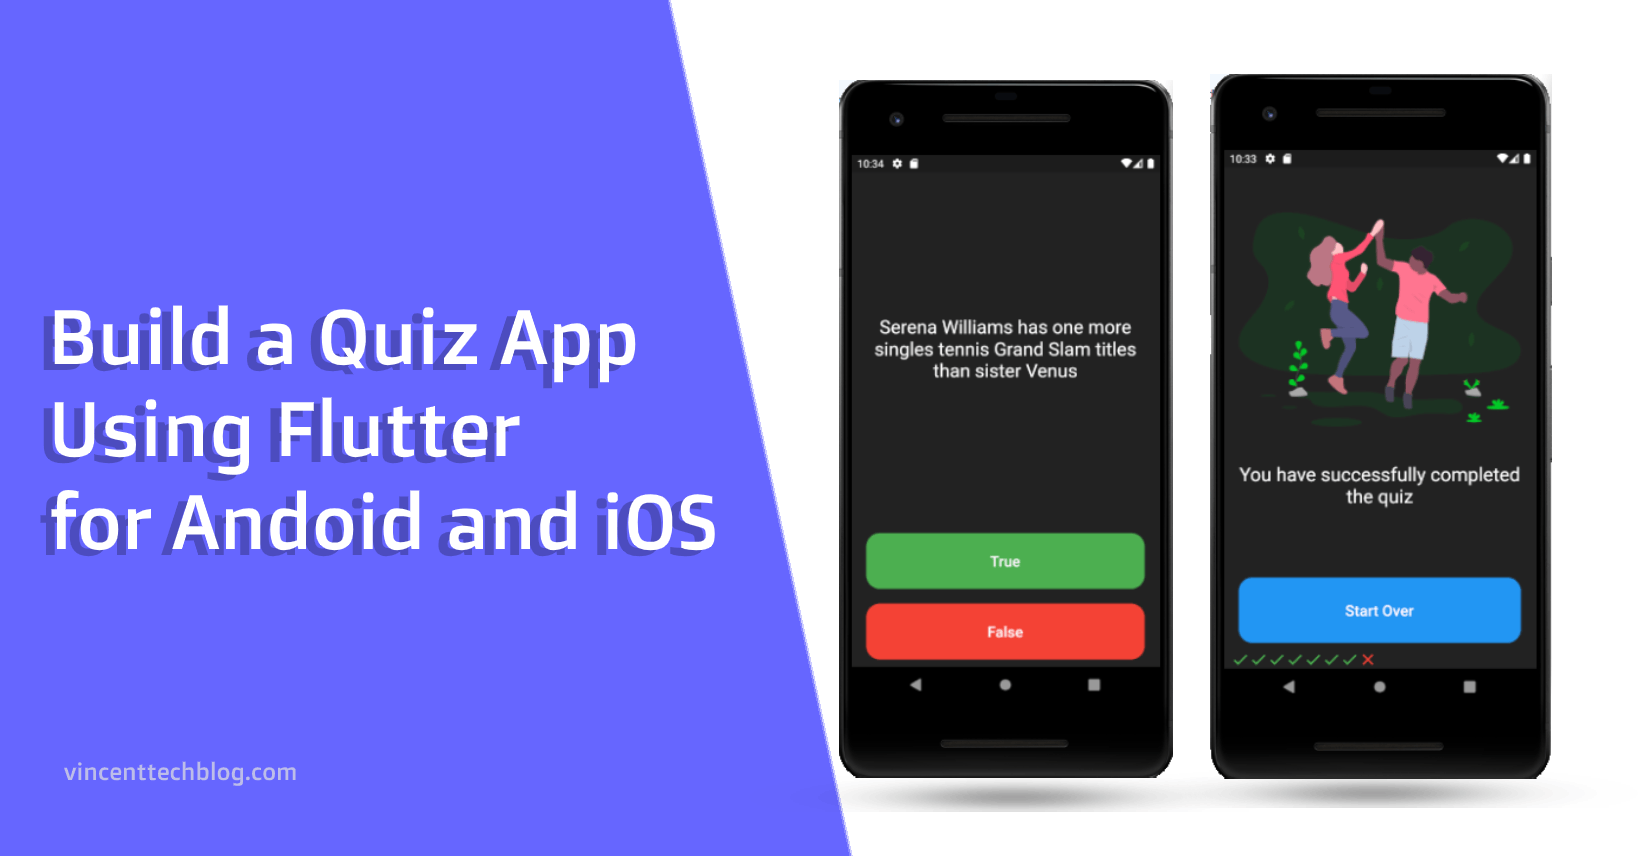
Question(qtn: 'Serena Williams has one more singles tennis Grand Slam titles than sister Venus', ans: true),
Question(qtn: 'The tutorial was very enjoyable', ans: true),
Question(qtn: 'You are using this app right now, you\'ve got no choice',ans: true),
Question(qtn: 'You are in a relationship', ans: false),
Question(qtn: 'Gin is typically included in a Long Island Iced Tea', ans: true),
Question(qtn: 'Monaco is the smallest country in the world', ans: false),
Question(qtn: 'Australia is wider than the moon', ans: true),
Question(qtn: 'Queen Elizabeth II is currently the second longest reigning British monarch', ans: false),
];
// this function will access the question number and increment it
// also it will let us know if the questions have been completed
dynamic nextQuestion(){
if(_questionNumber < _questionList.length - 1){
print(_questionNumber);
_questionNumber++;
}else{
bool completed = true;
return completed;
}
}
// this function will return the question text of the
//specific question number text when called in the main.dart
String getQuestionText(){
return _questionList[_questionNumber].questionText;
}
// this function will return the answer of the
//specific question number when called in the main.dart
bool getQuestionAnswer(){
return _questionList[_questionNumber].questionAnswer;
}
// this function will set the question
//number back the 0 when the quiz is restarted
int startOver(){
return _questionNumber = 0;
}
}
Add Assets to Flutter App
Ok, moving on, before opening our app, lets set the Assets for our project, Go to the root folder and create a new folder called ‘assets’. This will store all assets like images, music files, etc, But in our case, we are using a single SVG file.
After creating the ‘assets’ folder, go to the ‘pubspec.yaml’ file. make the changes as I have done below;
# To add assets to your application, add an assets section, like this:
  assets:
    - assets/
Ensure you remove the comments ‘#’ in front of the assets line and change the ‘images/’ to ‘assets/’ as we have created.
now run the command below to update our flutter app
$flutter packages get
Add SVG file to Flutter App
To get our SVG file like me, visit Undraw.co, and type ‘high five’ in the search box to get the same image we used.
After downloading the SVG, rename it to completed.svg and paste in our assets folder.
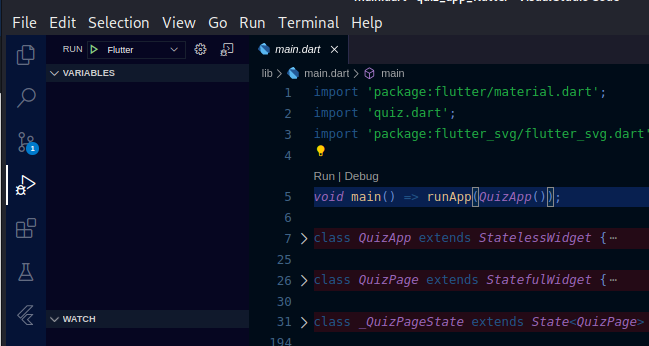
Now open the ‘lib/main.dart’ file – this is the entry file for our application, After opening it, remove all existing dummy code and paste the code below; This code has been explained in the code comments below;
// this imports default Flutter dart package
import 'package:flutter/material.dart';

// this imports a file containing the quiz questions class
import 'quiz.dart';

// this imports an external package to display svg images in our app
import 'package:flutter_svg/flutter_svg.dart';

// the main function returns our QuizApp() class and displays in as our entire app

void main() => runApp(QuizApp());

//This is the QuizApp class we refered to in the preview comment //above, it extents the Flutter statelessWidget class and overides //it with our own functionality using the '@override' notation
class QuizApp extends StatelessWidget {
  @override
  Widget build(BuildContext context) {
    return Container(
      child: MaterialApp(
        home: Scaffold(
          backgroundColor: Colors.grey.shade900,
          body: SafeArea(
            child: Padding(
              padding: EdgeInsets.symmetric(horizontal: 10.0),
              child: QuizPage(),
            ),
          ),
        ),
      ),
    );
  }
}
// Note that the above class calls the QuizPage class

//Here in the QuizPage class, we build teh widgets that actually //displays the questions and buttons
class QuizPage extends StatefulWidget {
  @override
  _QuizPageState createState() => _QuizPageState();
}

class _QuizPageState extends State {

// a variable to store our scores
  List scores = [];

// this creates an object of the Quiz class we import
  Quiz quizClass = Quiz();

// this is a variable to keep track of the quiz if completed
  bool completed = false;

// this function checks the user answer if correct
  void checkAnswer(bool userAnswer) {
    bool correctAns = quizClass.getQuestionAnswer();
    setState(() {
      if (quizClass.nextQuestion() == true) {
        print('next question');
        print(quizClass.nextQuestion());
        completed = true;
        if (userAnswer == correctAns) {
          scores.add(Icon(
            Icons.check,
            color: Colors.green,
          ));
        } else {
          scores.add(Icon(
            Icons.close,
            color: Colors.red,
          ));
        }
      } else {
        print('setting marks');
        if (userAnswer == correctAns) {
          scores.add(Icon(
            Icons.check,
            color: Colors.green,
          ));
        } else {
          scores.add(Icon(
            Icons.close,
            color: Colors.red,
          ));
        }
      }
    });
  }

//this is another overriden widget that calls the buildQuestionPage //function to setup our page
  @override
  Widget build(BuildContext context) {
    return buildQuestionsPage();
  }

// this function shows the questions when we start the app, and //showind the completed secttion if the quiz has been completed
  Column buildQuestionsPage() {
    if (completed) {
      return Column(
        crossAxisAlignment: CrossAxisAlignment.stretch,
        children: [
          Expanded(
            flex: 5,
            child: Padding(
              padding: EdgeInsets.all(10.0),
              child: Center(
                child: Column(
                  children: [
                    SvgPicture.asset('assets/completed.svg', width: 500.0),
                    Text(
                      'You have successfully completed the quiz',
                      textAlign: TextAlign.center,
                      style: TextStyle(color: Colors.white, fontSize: 25.0),
                    ),
                  ],
                ),
              ),
            ),
          ),
          Expanded(
            child: Padding(
              padding: EdgeInsets.all(10.0),
              child: FlatButton(
                  shape: RoundedRectangleBorder(
                    borderRadius: BorderRadius.circular(18.0),
                  ),
                  textColor: Colors.white,
                  color: Colors.blue.shade500,
                  onPressed: () {
                    setState(() {
                      completed = false;
                      scores = [];
                      quizClass.startOver();
                    });
                  },
                  child: Text(
                    'Start Over',
                    style: TextStyle(color: Colors.white, fontSize: 20.0),
                  )),
            ),
          ),
          SafeArea(
            child: Row(
              children: scores,
            ),
          )
        ],
      );
    } else {
      return Column(
        crossAxisAlignment: CrossAxisAlignment.stretch,
        mainAxisAlignment: MainAxisAlignment.spaceBetween,
        children: [
          Expanded(
            flex: 5,
            child: Padding(
              padding: EdgeInsets.all(10.0),
              child: Center(
                child: Text(
                  quizClass.getQuestionText(),
                  textAlign: TextAlign.center,
                  style: TextStyle(color: Colors.white, fontSize: 25.0),
                ),
              ),
            ),
          ),
          Expanded(
            child: Padding(
              padding: EdgeInsets.all(10.0),
              child: FlatButton(
                  shape: RoundedRectangleBorder(
                    borderRadius: BorderRadius.circular(18.0),
                  ),
                  textColor: Colors.white,
                  color: Colors.green.shade500,
                  onPressed: () {
                    checkAnswer(true);
                  },
                  child: Text(
                    'True',
                    style: TextStyle(color: Colors.white, fontSize: 20.0),
                  )),
            ),
          ),
          Expanded(
            child: Padding(
              padding: EdgeInsets.all(10.0),
              child: FlatButton(
                  shape: RoundedRectangleBorder(
                    borderRadius: BorderRadius.circular(18.0),
                  ),
                  textColor: Colors.white,
                  color: Colors.red.shade500,
                  onPressed: () {
                    checkAnswer(false);
                  },
                  child: Text(
                    'False',
                    style: TextStyle(color: Colors.white, fontSize: 20.0),
                  )),
            ),
          ),
          SafeArea(
            child: Row(
              children: scores,
            ),
          )
        ],
      );
    }
  }
}
Run App
To run our app. Go to the Run Tab on the left-menu of VScode or press Ctrl+Shift+D to open the ‘run’ panel.
Client on the Run or Play button and select your preferred emulator

Run App on Physical Device
In case, you do not have an emulator downloaded, you can as well use your physical Android device.
On your android device, you need to enable developer mode. Follow the steps below; Note that this depends on the type of Android device you use.
- Goto Settings > About phone > More or Software Information > Build number
- Tap Build number seven times. After the first few taps, you should see the steps counting down until you unlock the developer options. Once activated, you will see a message that reads, “You are now a developer!“
- Go back to Settings, where you’ll now find a Developer options entry at the very bottom of the menu.
After the steps above. Connect your phone to your laptop or PC, you’ll see a prompt asking you to enable “Allow USB Debugging?”. Select Yes and try to run your App again.
Now you’ll see your phone as an Option. Get Full code on my GitHub
Summary
In this post, we saw our to make use of OOP pillars of programming in Flutter, such as Abstraction, Encapsulation, Inheritance, and Polymorphism. to build a mini Quiz App.
![]()
Leave a Reply