Alright before we dive directly into working with tables, forms and CSS; We’ll go more into HTML learning about List Items and Attributes to improve our understanding of working with HTML.
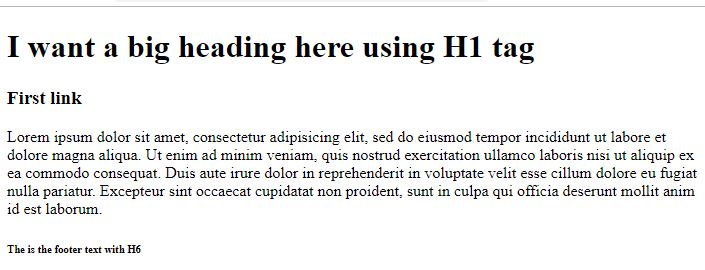
Below is a basic HTML page with the use of H1, H3, H6 and the <p> tag
[html]
<!DOCTYPE html>
<html>
<head>
<title>First Page Title</title>
</head>
<body>
<h1>I want a big heading here using H1 tag</h1>
<h3>First link</h3>
<p>Lorem ipsum dolor sit amet, consectetur adipisicing elit, sed do eiusmod
tempor incididunt ut labore et dolore magna aliqua. Ut enim ad minim veniam,
quis nostrud exercitation ullamco laboris nisi ut aliquip ex ea commodo
consequat. Duis aute irure dolor in reprehenderit in voluptate velit esse
cillum dolore eu fugiat nulla pariatur. Excepteur sint occaecat cupidatat non
proident, sunt in culpa qui officia deserunt mollit anim id est laborum.</p>
<h6>The is the footer text with H6</h6>
</body>
</html>
[/html]
Below is how it appears in the browser
Lists in HTML
We have two types of list namely ordered lists and unordered list
Ordered lists
- Orange
- Mango
- Pawpaw
Unordered lists
- Orange
- Mango
- Pawpaw
[html]
<!– Ordered List –>
<ol>
<li>Orange</li>
<li>Mango</li>
<li>Pawpaw</li>
</ol>
<!– Unordered List –>
<ul>
<li>Orange</li>
<li>Mango</li>
<li>Pawpaw</li>
</ul>
[/html]
From the little examples above, try stop here and go ahead to create a new HTML file to mimic what we have done so far using the tags like, <h1> (Heading One) , <p> (Paragraph), <ol> (Ordered list), <ul> (Unordered list), <li> (List Item), and more.
Working with Divs and Spans
A Div in HTML is a generic container and a tag as well which helps groups other tags together in a in a specific position on you html page. Div simply means division and we can have multiple divs in a html page.
A Span is also a generic container but works inline inside of a div tag. It is used to emphasize on a text or image inside a div or any other tag.
Working with Attributes
Attributes helps us add additional information to Tags.
Looks like:
[html] <tag name=”value”></tag> [/html]
The name above specifies the name of the attribute. You can learn about all the attributes in HTML here Mozilla CDN.
Most attributes don’t work with all tags, and also most tags have their own attributes. An example will be the image tag with the source (src) attribute.
[html] <img src=”orange.jpg”> [/html]
We also have the ‘a’ tags which are called anchor tags used for links in HTML. The anchor tag uses the href attribute which stands for Hyper Link Reference.
Syntax:
[html] <a href=”url”>Text</a> [/html]
Example for external link to a different website:
[html] <a href=”http://www.google.com”>Click me to go to Google</a> [/html]
Example for internal link to a different page of the same website:
[html] <a href=”page2.html”>Go to Page 2</a> [/html]
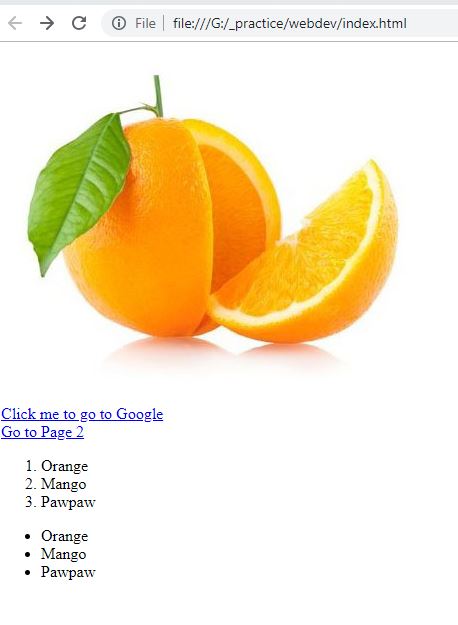
Note: With the image tag, there is no opening and closing tag because it is a self closing tag. Moreover, making an html document with these examples will look like this:
[html]
<!– Add the image –>
<img src=”orange.jpg”>
<!– My Link –>
<br>
<a href=”http://www.google.com”>Click me to go to Google</a>
<br>
<a href=”page2.html”>Go to Page 2</a>
<!– Ordered List –>
<ol>
<li>Orange</li>
<li>Mango</li>
<li>Pawpaw</li>
</ol>
<!– Unordered list –>
<ul>
<li>Orange</li>
<li>Mango</li>
<li>Pawpaw</li>
</ul>
[/html]
You will notice that we have a <br> tag which is called the break tag for specifying a break in our html tags. Also make sure you create a new page called page2.html in you root folder so that , the link would work.
LOOKS LIKE
In the next lesson, we’ll go into HTML Tables and Forms


