

GraphQL is a fast-rising specification for building API since it’s release by Facebook in 2015, it has been adopted by Facebook, Github, Pinterest, Yelp, Paypal, Shopify, Atlassian to mention a few. Read more: HERE
I came up with this combination because I have been reading about GraphQL, SQLAlchemy about 2 weeks now. So I decided to build an API with Python + Flask + GraphQL + SQLAlchemy + PostgreSQL
Setup Virtual Environment for Python
If you are coming from the Node/Javascript Environment just like me. Look at this map below showing how the technologies compare to what you know already. If you are not from the Javascript angle. Just continue…
- Python == Javascript
- Flask == Node/Express
- GraphQL == GraphQL (this is supposed to be a better option for RestAPI)
- SQLAlchemy == Sequelize or Objection.js
- PostgresSQL == PostgresSQL
Getting Started
Our aim is to build an API for a book store. Using said technologies, I’ll assume that you have a fair knowledge of Python, PostgreSQL and how to set up the Text-editor environment (e.g VSCode).
Source code Repo HERE
You can clone the repo to read through
Let’s create our project directory and switch into it to be our current working directory
$ mkdir book-store-api
$ cd book-store-api
Setup Virtual Environment
I’ll be setting up this API with a virtualenv container. You can as well use Docker. The benefit of the virtual environment is to isolate our Python environments. It creates a folder that contains all the necessary executables to use the packages that a Python project would need. It can be used standalone.
If you don’t have it installed already; Ensure to use pip3 if you have both Python 2 and Python 3 installed or if you use a Macbook.
$ pip install virtualenv
Now let’s create the virtual environment for our project and activate it
$ virtualenv venv
$ source venv/bin/activate
The command above will create a virtual environment in our project folder. Execute the command below to install your project dependencies.
$ pip install flask flask-graphql flask-migrate sqlalchemy graphene graphene-sqlalchemy psycopg2-binary
Note: SQLAlchemy needs a “driver” to connect to my PostgreSQL database. So we added psycopg2-binary package
Now, we’ll create an app.py file in our folder root directory. Add the following code to the file. For now, we’ll be using a single file and later refactor when our functionalities are birthed
# Imports
from flask import Flask

# initializing our app
app = Flask(__name__)
app.debug = True

# Configs
# Our database configurations will go here

# Modules
# SQLAlchemy will be initiated here

# Models
# Our relations will be setup here

# Schema Objects
# Our schema objects will go here

# Routes
# Our GraphQL route will go here

@app.route('/')
def index():
    return 'Welcome to Book Store Api'
if __name__ == '__main__':
     app.run()
Note: The we shall populate the descriptive comments as we move on.
Now, from the terminal let’s run python app.py. This will set up a debug server for us. Go ahead and visit 127.0.0.1:5000 If you see “Welcome to Book Store-Api” written on the page, then you’re on the right path.
Add our Database
Now, let’s add a database to our application. We’re going to use SQLAlchemy to create our DB models and PostgreSQL for our Book Store API DB.
Add the following code to app.py file.
# Imports
...
from flask_sqlalchemy import SQLAlchemy

# Configs
# Replace the user, password, hostname and database according to your configuration information

app.config['SQLALCHEMY_DATABASE_URI'] = 'postgresql://user:password@hostname/database_name'
app.config['SQLALCHEMY_COMMIT_ON_TEARDOWN'] = True
app.config['SQLALCHEMY_TRACK_MODIFICATIONS'] = True

# Modules
db = SQLAlchemy(app)
Now let’s add Models
In the code below, we’ll be creating two models Book and User and make a relationship between the two.
# Modules
db = SQLAlchemy(app)

# Models
class User(db.Model):
    __tablename__ = 'users'

    id = db.Column(db.Integer, primary_key=True)
    username = db.Column(db.String(80), unique=True, index=True nullable=False)
    email = db.Column(db.String(120), unique=True, nullable=False)
    books = db.relationship('Book', backref='author')

    def __init__(self, username, email):
      self.username = username
      self.email = email

    def __repr__(self):
        return '' % self.id

class Book(db.Model):
    __tablename__ = 'books'

    id = db.Column(db.Integer, primary_key=True)
    title = db.Column(db.String(256), index=True, nullable=False)
    description = db.Column(db.Text, nullable=False)
    year = db.Column(db.Integer, nullable=False)
    author_id = db.Column(db.Integer, db.ForeignKey('users.id'))

    def __repr__(self):
        return '' % self.title % self.description % self.year % self.author_id
Now let’s create some demo data. Type python3 or python from the terminal. and execute the following code line by line
>>> from app import db, User, Book
>>> mike = User(username='mikedean', email='[email protected]')
>>> db.session.add(mike)
>>> db.session.commit()
>>> flaskbook = Book()
>>> flaskbook.title = "Building with Flask"
>>> flaskbook.description = "The best Flask Python book on the web"
>>> flaskbook.year = 2019
>>> flaskbook.author_id = mike.id
>>> db.session.add(flaskbook)
>>> db.session.commit()
At this point, you can check your database to see the demo data entered
Lets Integrate GraphQL
We’ll start by adding Schemas and later add Mutations
Schemas in GraphQL present our objects globally as a graph structure So we need to show which type of object will be shown in the graph.
Moreover, schemas are used to describe your data. So let’s create a schema for our models.
Add the following set of codes to app.py
# Import
...
import graphene
from graphene_sqlalchemy import SQLAlchemyObjectType, SQLAlchemyConnectionField

...

# Schema Objects
class BookObject(SQLAlchemyObjectType):
   class Meta:
       model = Book
       interfaces = (graphene.relay.Node, )

class UserObject(SQLAlchemyObjectType):
   class Meta:
       model = User
       interfaces = (graphene.relay.Node, )

class Query(graphene.ObjectType):
    node = graphene.relay.Node.Field()
    all_books = SQLAlchemyConnectionField(BookObject)
    all_users = SQLAlchemyConnectionField(UserObject)

schema = graphene.Schema(query=Query)

...
Now, add the GraphQL interface called GraphiQL
# Imports
...

from flask_graphql import GraphQLView

...

# Routes
app.add_url_rule(
    '/graphql-api',
    view_func=GraphQLView.as_view(
        'graphql',
        schema=schema,
        graphiql=True # for having the GraphiQL interface
    )
)

...
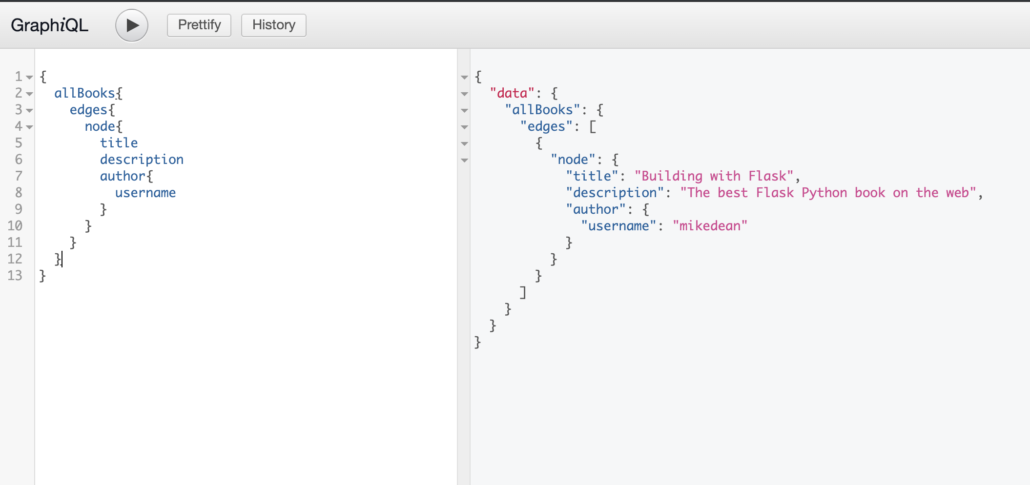
Now, navigate to 127.0.0.1:5000/graphql-api you’ll see the GraphQLi view. Go ahead and Write your GraphQL query
{
  allBooks{
    edges{
      node{
        title
        description
        author{
          username
        }
      }
    }
  }
}
Below is a snapshot of my GraphiQL
Mutations
Mutations will help us to be able to add books or users to our Book Store API. So let’s start adding data
...

# Schema Objects

...

class AddBook(graphene.Mutation):
    class Arguments:
        title = graphene.String(required=True)
        description = graphene.String(required=True)
        year = graphene.Int(required=True)
        username = graphene.String(required=True)
    book = graphene.Field(lambda: BookObject)

    def mutate(self, info, title, description, year, username):
        user = User.query.filter_by(username=username).first()
        book = Book(title=title, description=description, year=year)
        if user is not None:
            book.author = user
        db.session.add(book)
        db.session.commit()
        return AddBook(book=book)

class Mutation(graphene.ObjectType):
    add_book = AddBook.Field()
schema = graphene.Schema(query=Query, mutation=Mutation)
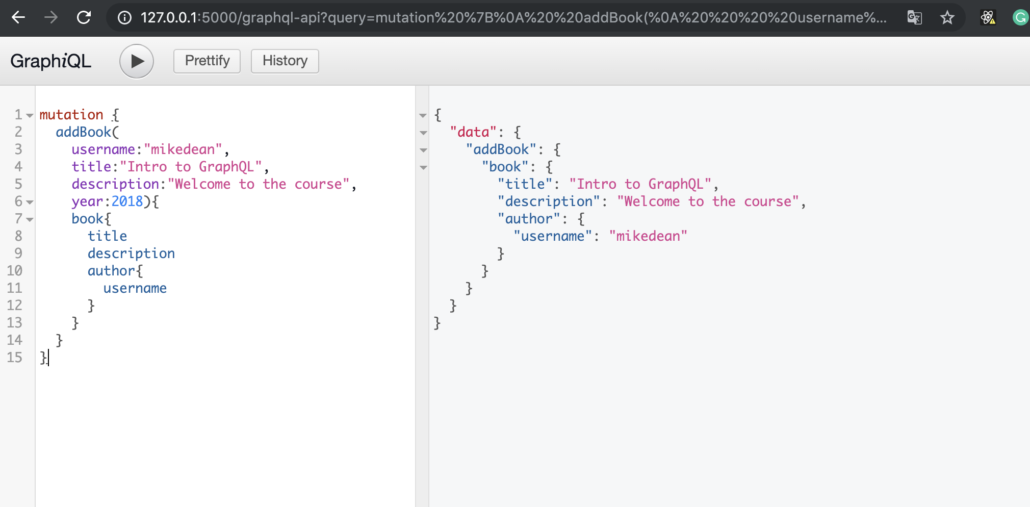
Now, let’s add a new book with GraphQL mutations
mutation {
  addBook(
    username:"mikedean",
    title:"Intro to GraphQL",
    description:"Welcome to the course",
    year:2018){
    book{
      title
      description
      author{
        username
      }
    }
  }
}
The is my output below;
Congratulations 😄!. You have successfully built a Web API with Python, Flask, GraphQL, SQLAlchemy, and PostgreSQL 👏.
The post is open to improvements so if there’s anything you’d like to add please comment about it. Also, we’ll be looking at breaking down our code info a clean folder structure in the next post.
![]()
Leave a Reply